

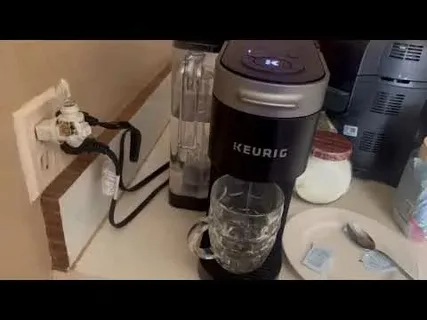
Why Descaling Your Keurig Slim Matters
If your morning coffee has started tasting a little off slightly bitter, oddly flat, or just not as hot as it used to be your Keurig Slim might be trying to tell you something. The problem usually isn’t your coffee beans. It’s scale.
Scale is the chalky, white mineral buildup that forms inside your brewer over time, caused by the calcium and magnesium naturally found in tap water. It coats the internal water lines, heating elements, and needle assembly of your machine, slowly strangling the performance you paid for.
Learning how to descale a Keurig Slim is one of the most important maintenance habits any Keurig owner can build. It directly affects the taste of your coffee, the brewing temperature, and the long term lifespan of the machine. Skip it long enough, and you’re looking at a brewer that won’t exit descale mode, won’t dispense a full cup, or simply stops working altogether.
The good news? The Keurig Slim descaling process takes about 15 to 20 minutes and requires no tools, no disassembly, and no technical knowledge. This guide walks you through every step with clarity including what to do when things don’t go as planned.
What You’ll Need Before You Start
Before you run the descale cycle on your Keurig Slim, gather a few items so the process goes smoothly without interruption.
- Keurig Descaling Solution (one full bottle) or distilled white vinegar as an alternative
- Fresh, clean water for refilling the reservoir
- A large ceramic mug (at least 12 oz) never use a paper cup, as the hot liquid can cause it to collapse
- Access to a sink for discarding hot liquid between cycles
- About 20 minutes of uninterrupted time
One important detail before you begin: make sure there is no K-Cup pod in the pod holder. Running a descale cycle with a pod inside can damage the machine and waste your coffee grounds. Remove the pod, close the lid, and you’re ready.
How to Descale a Keurig Slim: The Complete Step-by-Step Process
This is the section most people are looking for. Follow these steps carefully, especially the button sequence it trips up a lot of first timers.
Step 1: Empty the Water Reservoir
Remove the water reservoir from your Keurig Slim and pour out any remaining water. If your machine has a water filter installed, remove and set it aside. You’ll replace it after the process is complete.
Step 2: Add the Descaling Solution
Pour the entire bottle of Keurig Descaling Solution into the empty reservoir. Then, fill that same empty bottle with fresh water and add it to the reservoir as well. This gives you roughly a 1:1 ratio of solution to water.
Place your large ceramic mug on the drip tray beneath the spout.
Step 3: Activate Descale Mode
Here is the step that causes the most confusion. To put your Keurig Slim into descale mode, the machine must be plugged in but powered OFF.
With the brewer off, press and hold the 8 oz and 12 oz buttons simultaneously for 3 seconds. You’ll know it worked when the DESCALE light turns solid (stops flashing) and the BREW button begins to flash.
Do not press the power button at this stage. That’s the most common mistake turning the machine on first actually prevents descale mode from activating.
Step 4: Run the Descale Brew Cycles
Once the BREW button is flashing, press it to begin the first descale brew. The machine will dispense a stream of hot descaling solution into your mug. When the cycle finishes, carefully pour the contents of the mug into the sink the liquid is hot.
Press the BREW button again to run another cycle. Continue this process, emptying your mug into the sink each time, until the ADD WATER light illuminates. This signals that the reservoir is empty and the descaling phase is complete.
How to Rinse Your Brewer After Descaling
Descaling removes the mineral buildup, but the rinse step removes any residual solution from the internal lines. Skipping this step can leave a chemical taste in your next cup of coffee.
Remove the reservoir and rinse it thoroughly with fresh water. Refill it to the MAX fill line with clean water. Place your ceramic mug back under the spout.
When the BREW button begins flashing again, press it to run a rinse brew. Pour the dispensed water into the sink. Repeat this rinse cycle until the DESCALE notification turns off. On most K-Slim models, this takes two full rinse cycles to complete.
Once the DESCALE light goes off, your brewer has exited descale mode and is ready to brew coffee again. Reinsert your water filter if you removed one earlier, refill the reservoir, and enjoy.
What If the Descale Light Won’t Turn Off?
This is the most common complaint from Keurig Slim owners online and it’s genuinely frustrating. You follow every step correctly, run the cycles, and that stubborn DESCALE light just keeps flashing. Here’s what to do.
First, check whether the full rinse cycle completed. The DESCALE light is designed to stay on until the machine confirms the rinse cycle ran to completion. If you powered off the machine mid rinse or the reservoir ran dry before the ADD WATER light triggered, the machine may not have registered the process as finished.
Try this reset sequence:
- Turn the brewer off.
- Unplug it from the wall.
- Wait 30 seconds.
- Plug it back in — do not press the power button.
- Press and hold the 8 oz and 10 oz buttons together for 3 seconds.
This often clears the descale alert manually. If the light persists after two complete descale cycles and a hard reset, contact Keurig customer support at 1-800-901-BREW. Some units ship with a sensor fault that qualifies for a free replacement under warranty.
Vinegar vs. Keurig Descaling Solution: Which Should You Use?
This debate comes up every time someone researches how to descale a Keurig Slim, and the answer is more nuanced than you’d think.
White vinegar is the budget friendly option. It’s acidic enough to dissolve most mineral deposits and you probably already have it in your kitchen. The downside is that vinegar has a strong, pungent smell that can linger in your brewer’s internal lines for several brew cycles after rinsing. You’ll typically need four to six rinse cycles to fully eliminate the taste which adds time to the process.
Keurig’s Descaling Solution is formulated specifically for their brewers. It’s more effective at breaking down scale, works faster, and rinses clean in just two cycles. It costs more than vinegar, but for most users, the convenience and reliability are worth it.
If you use vinegar, use distilled white vinegar diluted 1:1 with water never use undiluted vinegar, as it can damage the rubber seals inside the machine over time. Also note that Keurig’s official warranty terms recommend against using vinegar, so if your machine is still under warranty, stick with the branded solution.
How Often Should You Descale a Keurig Slim?
Keurig recommends descaling every 3 to 6 months for average household use. Your K-Slim also has a built-in maintenance alert that triggers after every 250 brew cycles so the machine essentially tracks this for you.
However, a few factors may require you to descale more frequently:
- Hard water areas: If your tap water has a high mineral content (which is common in many parts of the US, UK, and South Asia), scale builds up significantly faster. You may need to descale every 6 to 8 weeks.
- High-volume brewing: If you’re brewing 4 or more cups a day, don’t wait the full 6 months.
- Signs of trouble: Slow brewing, inconsistent cup size, lukewarm coffee, or an unexpected DESCALE light are all signs it’s time to run the cycle regardless of when you last did it.
A simple test to check your water hardness: fill a clear glass with tap water, add a few drops of liquid soap, and shake it. If it doesn’t lather easily and leaves the water looking cloudy rather than sudsy, you have hard water and should plan to descale more often.
Keeping Your Keurig Slim Running Like New
Descaling is the cornerstone of Keurig maintenance, but it works best as part of a broader care routine. A few simple habits can dramatically extend the life of your machine and keep every cup tasting fresh.
Clean the exit needle monthly. Coffee grounds and oils accumulate in the needle that punctures the K-Cup. Use the Keurig needle-cleaning tool (included with many models) or carefully insert a straightened paper clip into the needle’s opening while the machine is unplugged. Run two rinse cycles afterward.
Wash the water reservoir weekly. Remove it, rinse with warm water, and wipe it down with a soft cloth. Never put it in the dishwasher — the heat can warp the plastic and affect the seal.
Wipe the drip tray often. Coffee drips and water residue collect here and can grow mold if left unchecked. It lifts off easily for a quick rinse under the tap.
Use filtered water when possible. Even a basic Brita filter on your tap can meaningfully reduce the mineral content of the water going into your Keurig Slim, slowing scale buildup between descale cycles.
When you combine regular needle cleaning, reservoir washing, and a consistent Keurig Slim descaling schedule, your machine will perform reliably for years not just months.
FAQ
How long does it take to descale a Keurig Slim?
The full process descaling solution cycles plus the fresh water rinse takes approximately 15 to 20 minutes from start to finish. If you’re dealing with heavy scale buildup, it may take slightly longer because you’ll run more brew cycles before the reservoir empties.
Can I use apple cider vinegar instead of white vinegar to descale my Keurig Slim?
It’s not recommended. Apple cider vinegar has a much stronger taste and aroma than distilled white vinegar, and it’s significantly harder to rinse out of the machine’s internal lines. Stick with distilled white vinegar if you’re going the vinegar route, or better yet, use Keurig’s official descaling solution.
Why is my Keurig Slim not brewing after descaling?
This usually happens because the descale solution wasn’t fully rinsed out, or the water reservoir isn’t seated properly in the machine. Remove and reseat the reservoir, run two to three fresh water cycles, and try again. If the machine still won’t brew, unplug it for 30 minutes and restart.
Is it safe to drink coffee right after descaling a Keurig Slim?
Yes once you complete the full rinse cycle and the DESCALE light turns off, the internal lines are free of solution residue. It’s always a good idea to run one extra rinse brew for peace of mind, especially if you used vinegar, before brewing a cup you plan to drink.
How do I know when my Keurig Slim needs to be descaled?
Your machine will illuminate the DESCALE light after 250 brew cycles. Beyond that, watch for these signs: coffee that brews slower than usual, cups that aren’t as full as expected, coffee that tastes bitter or metallic, or a brewer that makes louder-than-usual noises during brewing. Any of these is a reliable signal that it’s time to descale.
Keeping up with your Keurig Slim’s maintenance doesn’t have to be a chore. Once you’ve done the descale cycle once, the whole process becomes second nature and the payoff is real. Better-tasting coffee, a longer-lasting machine, and mornings that actually start right.